
All I wanted was a large landscape image for the twenty-five-foot white wall in the studio so that it did not look like just a large white wall when not in use. I had not intended to create a new workflow or figure out a thing.
When I say landscape, I wanted an image of such high resolution that is was like looking out of a window. I wanted so much detail that when you stepped closer you could read the signs on the roads or count the rails in the guard rail or count the stones in the riverbed yet be eight to ten feet across.
I also wanted to use the tools I had at hand without buying a new camera or new lens. Mostly I was successful at this. I did have a head start because I had shot medium format from my college days before there were digital cameras or Macs or Windows.
I was scheduled to take a trip to the highlands of Scotland and wanted to keep things simple. The goal was one camera and one lens. The camera I elected to use was my Hasselblad 500CM.
I have a full set of lenses from a 40mm Distagon to a 150mm Sonnar. Since we are talking about Scotland and a great deal of hiking, I elected to stick with an 80mm Planar due to its small size and speed.
Most of the time I shoot with a CFV-50c II digital back, but I have A12 and A70 backs. The digital back is great and delivers great results, but it does not make full use of the lens as the sensor is 43.8mm x 32.9mm verses the film image size of 60mm x 60mm. Here is where things started to go off the rails. Film is a thing again but could film deliver the resolution of the digital back? The answer is yes, kind of, depending on the film. In my research I learned that Kodak Ektar 100 120 for the A12 backs and Kodak Vision 3 65mm for the A70 backs were ultra fine grain high saturation films that could be scanned at 6400DPI. Doing the math, either film will resolve at 88.9 megapixels in the same space as the digital sensor. When you consider the 60mm x 60mm negative size, the resolution becomes 220 megapixels, but enough math let’s get back to process.
Using an 80mm lens meant that I would be taking multiple images and stitching them together using Lightroom. The next step though is scanning. The lab I use will scan when they process, but they do not scan beyond 2400DPI. In the studio we use an Epson V850 scanner which will optically scan up to 6400DPI. Using Vuescan with the Ektar 100 Gen 2 profile and a glass film carrier to keep the image absolutely flat, I was able to come up with 220-megapixel, 1.2 gigabyte DNG files for Lightroom.
In order to shoot panoramic images with film, it is helpful to have a tripod head that has a scale and a viewfinder with a grid. Using these two tools you can shoot with a bit of overlap to your images. The whole process is confusing to those watching you, but when you are shooting a Hasselblad on a tripod with a fancy head and using a trigger, folks figure you know what you are doing.
By this point you are probably thinking, why not just shoot digital and have more panels to merge. This is a valid question. In the highlands, the conditions change quickly. It is often windy. When you are doing a panorama in that type of condition, the clouds move fast, light levels change and shadows change because of the clouds. Getting the panorama in as few panels as possible is key. This is also part of the compromise of using the 80mm verses the 40mm which weighs more than the camera and back. So, we are back to getting as much data in one panel as possible which brings us back to film, scanning, and merging.
Importing to Lightroom is straight forward. Merging in Lightroom is simple. Select your images, right click and select merge and then panorama. After a few minutes, your computer locks up. Well, I was trying to merge six images. It turns out Lightroom has a merge size limited to 500 megapixels. My workflow needed another step. Once the images are converted from negatives to positives in Lightroom, I export each image individually into Photoshop. Photoshop can handle more data in the panorama.
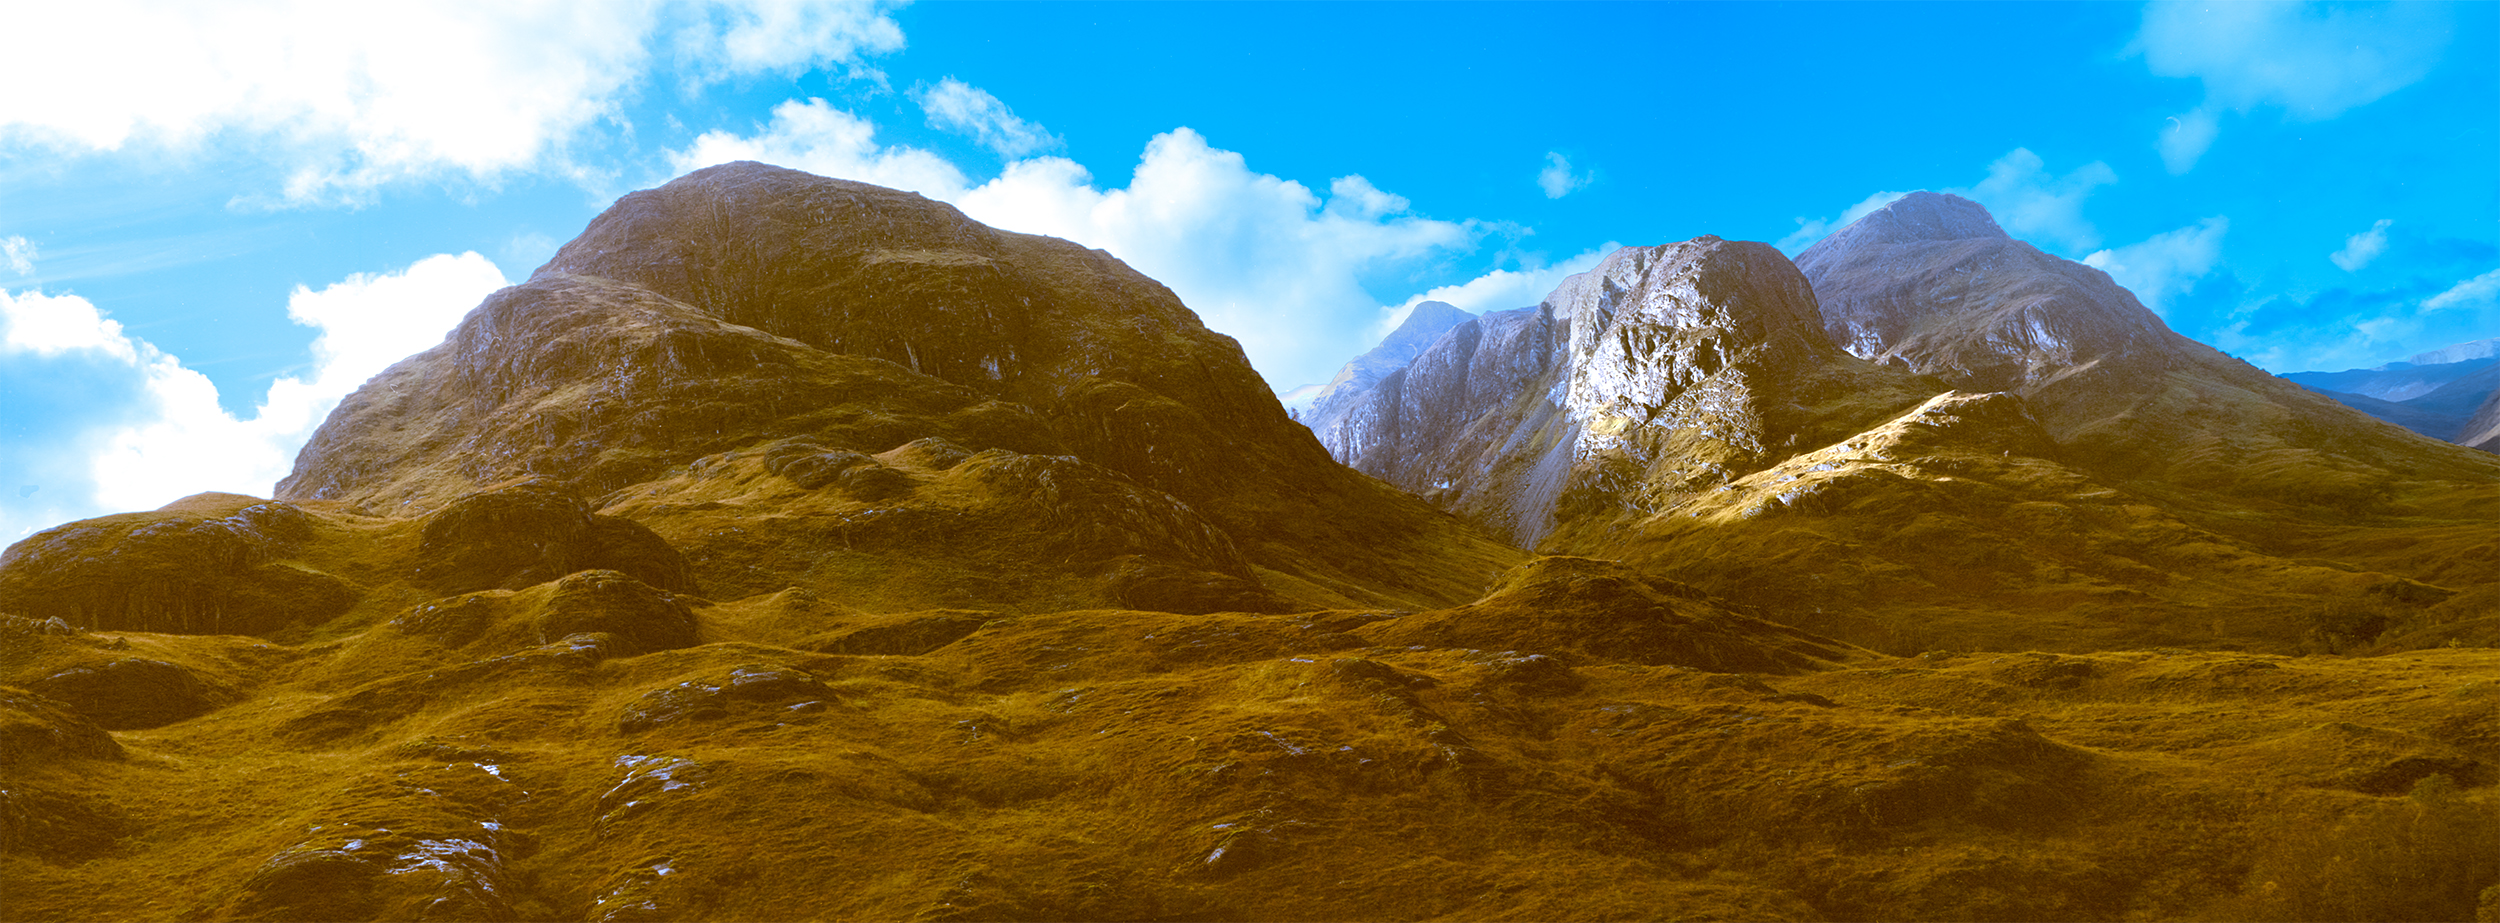
I made three sets of panels for my panoramas, one set with three images, one set with six images, and one set with twelve images. The image with this article is a six-panel panorama. Once the images were merged, I cropped the panorama into an XPan or 65×24 aspect ratio. The result has a resolution of just under one gigapixel with a native print size of 84 x 31.5 inches at 600DPI. What you see is the scaled down for the web version with this article.
What are the TWO most impactful features that make your image a good photograph? Don’t be shy!
In 2025 that a panorama can still render incredible depth and the color.
If you could make this photo again, what would be the ONE thing you would like to do better or differently?
Nothing.
Steve Bauserman shared this photograph with the FRAMES Facebook Group.
Photographer
Steve Bauserman, Sugar Land, Texas, USA
Equipment and settings
Hasselblad 500CM with waist level finder and 80mm Planar lens using Ektar 100 120 film on a Small Rig carbon fiber tripod with a pano head. Images were shoot at F16 and 1/125 of a second.

FRAMES is a unique international photography community that combines the best of all worlds, bringing you print and digital publications, a global membership platform, access to live events, and a dedicated mobile application.
EXPAND YOUR PHOTOGRAPHIC VISION
JOIN FRAMES TODAY
Mike Smith
January 13, 2026 at 15:02
Steve is a friend of mine in Houston, if one thing I know about him he pushes everything to the max for quality. A great guy and photographer. He needs more cars though.